


Space-Saving Furniture Ideas Perfect for Compact Living
Living in a compact space doesn’t mean compromising on style or functionality. With clever furniture choices and creative layouts, you can transform even the smallest apartment into a comfortable and…
Preventing Water Damage in Your Brickwork with Proper Care
Brickwork is a classic and enduring choice for homes and buildings, admired for its strength, beauty, and timeless appeal. However, even the most durable materials are not impervious to the…
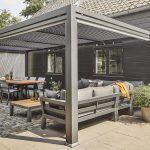
Digging Deep: Techniques for Installing Landscape Features
Enhancing Your Outdoor Space Transforming an outdoor area into a beautifully landscaped garden involves more than just choosing plants and decorative elements. The real work lies beneath the surface, where…
Sealing and Protecting Floors for Maximum Durability
The Importance of Floor Protection Flooring is not just a part of your home’s aesthetics; it’s a significant investment that requires careful maintenance to ensure its longevity. Whether it’s the…
From Rustic to Modern: How Wood Floors Fit Every Style
Wood floors have an incredible versatility that allows them to seamlessly blend with almost any decor style, from cosy rustic cottages to sleek, modern apartments. Their timeless appeal, durability, and…
What It Means to Be Ready for the Unexpected
Life is full of surprises—some good, some not so good. While we can’t predict the future, we can certainly prepare for it. Being ready for the unexpected means more than…
Winter Home Hacks: How to Stay Safe and Prepared for Any Winter Weather
Adequate insulation is one of the best ways to keep your home warm during winter. Start by checking for drafts around your windows and doors. Use weather stripping and caulking…
Sofabeds vs. Traditional Beds: Which is Right for You?
Introduction In the ever-evolving landscape of home furnishings, the choice between sofabeds and traditional beds has become a significant consideration for many homeowners. With space often at a premium, especially…
Wardrobe Styles Explained Find the Perfect Fit for Your Room
Introduction Selecting the perfect wardrobe for your space can significantly impact both the functionality and aesthetics of your room. Wardrobes are essential furniture pieces that not only help you organize…
Eco-Friendly Home Decor Sustainable Choices for a Greener Home
Introduction As awareness of environmental issues continues to grow, the demand for eco-friendly products in various sectors, including home decor, has surged. Home decor is no longer just about aesthetics;…